Digital FXtbook
Easy Contacts
  • Home
    • Software
    • The Author
    • Former Students Hall of Fame
    • A tribute....
  • 3d Training
    • Game Design >
      • Treasure Hunt
      • Unity >
        • Unity's Interface >
          • Our First Assignment
        • Unity Essentials >
          • 3d Gaming Essentials >
            • The Floor is Lava Name Project
          • Introduction to Scripting >
            • Getting Started with Scripting
            • Default Scripting
            • Scripting a Game Object
          • Real Time Audio >
            • Adding Background Music
            • 3-d Audio effects
          • 2d Essentials >
            • 2d Game Objects
            • Objects on 2d Game Objects
        • Creative Core >
          • Introduction to Creative Core
          • Shaders and Materials
          • Lighting
          • Animation
          • VFX
          • Cameras
          • Post Processing
          • Audio
          • User Interface
          • Proto-Typing
      • Maya >
        • Modeling >
          • Introduction: The Temple
          • Name Text Curve
          • Minecraft Steve
          • Minecraft Tools and Weapons
          • Roblox Character modeling
          • Garbage Can
          • Hammer
          • Sword of Light
          • Buzz Axe
          • Halo 1 Blood Gulch Base
          • Hammer
          • Sword
          • Character Modeling Big Daddy
          • Shield
          • The OM6G
          • Weapon
          • Character Modeling Legion the Geth
          • Character Modeling Geth Armor
        • Animation >
          • Character Animation
        • Rigging >
          • Rigging with HumanIK
          • Characterizing and MoCap
          • Integration with Unity
    • Computer Animation >
      • AutoDesk
      • Introduction: The Temple
      • Creating a Film >
        • Scriptwriting and Planning
        • StoryBoarding
        • Story Reels
      • Modeling >
        • The Nail
        • First Freestyle Lesson >
          • Cup and Straw
          • Garbage Can
        • Fence
        • Hammer
        • House
        • Environment Bubble
      • Animation >
        • Beginning Animation
        • Animation - Walk Cycle
        • Facial Animation
      • Rendering >
        • Arnold Rendering
      • Editing film >
        • Credits
        • Video Editing
      • Characters
    • Advanced Modeling and Rigging >
      • Unity VR Development >
        • VR Setup
        • VR 1st Project
      • Modeling and Rigging >
        • Linda Training >
          • Advanced Modeling >
            • Modeling Basics
            • Modeling Room Objects
          • Rigging >
            • Rigging Basics
            • Rigging Creating Skeletons
            • Rigging: Body Controls
            • Rigging: Hands
            • Rigging: Skinning
        • Modeling >
          • Image Planes
          • Polygon Modeling >
            • Coke Can
            • Low Polygon Character
            • Character Modeling Legion the Geth
            • Character Modeling Geth Armor
            • Face Modeling
          • NURBS Modeling >
            • Intro to NURBS
            • Lofting
            • CV Curves
            • Organic Modeling
            • Autombile
        • Texturing
        • Rigging >
          • Rigging with HumanIK
          • Smooth Skinning
        • Motion Capture
        • Blender
      • 3d Animation >
        • Linda Training >
          • Animation - Fundamentals
          • Animation - Next Steps
          • Animation - Pose to Pose
          • Animation - Facial Animation
          • Animation - Lip and Body Animation
        • Arnold Rendering
        • Reference Videos
        • Beginning Animation
        • Characters
  • Coding
    • Unity Coding >
      • Intro to Programming 1 >
        • Player Control 1 >
          • Player Control 1.2
          • Player Control 1.3
          • Player Control 1.4
        • Player Control 2 >
          • Player Control 2.2
          • Player Control 2.3
          • Player Control 2.4
        • Player Control Challenge
      • Intro to Programming 2 >
        • Sound and Effects >
          • Sound and Effects 3.2
          • Sound and Effects 3.3
          • Sound and Effects 3.4
        • GamePlay
        • User Interface
        • Feedback and Testing
        • Next Steps
      • Intro to Programming 3 >
        • Manage Scene Flow and Data
        • Apply Object-Oriented Principles
    • C# Game Scripting >
      • First Program >
        • Getting input from the User
      • Comments >
        • PsuedoCode
      • Variable Types >
        • AlphaNumeric Variables
        • Numeric Variables
        • Putting it all together
      • Operators >
        • Assignment and Arithmetic Operators >
          • Use of Parenthesis
          • Algebra in code and assundry CHAOS
        • Comparison and Logical Operators >
          • Logical Data, Illogical Assignment
        • Operator Assignments >
          • Floats Conversion from Metric to English
          • When is Easter??
        • Random Class
      • Arrays >
        • Simple Arrays
        • Complex Arrays
      • Conditional Statements >
        • Number validator
        • Number tester
        • Speed Camera
      • Loops >
        • For Loops >
          • Adding Numbers
        • For Each Loops
      • Try and Catch
      • Casting
      • Object Oriented Programming
      • U to Me >
        • Introduction Unity Lesson
        • Number Wizard Game #1
        • Second Unity Game: Text Adventure
        • Number Wizard Game GUI >
          • Block Breaker >
            • Block Breaker Game #1
            • Block Breaker Game #2
            • Block Breaker Game #3
            • Block Breaker Game #4
  • Broadcasting
    • Treasure Hunt
    • Audio >
      • Microphones >
        • Construction
        • Patterns
        • Peripherals
      • Mixers >
        • Types and Styles
        • Audio Computer Interfaces
        • Layout and Interface
        • Peripherals
        • Cords
      • PodCasting >
        • Setup and Operation
        • PodCasting Assignment
      • Boom Operating >
        • Equipment
        • Setup and Operation
    • Video >
      • Cameras >
        • Construction
        • Layout and Interface
        • Types and Styles >
          • Photography
          • Video
          • PTZ and Interfaces
      • Peripherals >
        • Power
        • Cords
        • Stabilizers >
          • Tripods and Chest Rigs
          • Gimbals and Sliders
        • Transmitting Wirelessly
      • Live Broadcasting >
        • Computer Interface >
          • Audio
          • Video
        • Streaming >
          • OBS
          • StreamYards
          • Software
      • Pre-Recorded >
        • Editing >
          • Premier >
            • Chapter 1
            • Chapter 2
            • Chapter 3
            • Editing A-Roll
            • Chapter 4
            • Editing B-Roll
            • Chapter 5
            • Chapter 6
            • Chapter 7
            • Chapter 8
            • Chapter 9
            • Chapter 10
            • Chapter 11
            • Chapter 12
    • Journalism >
      • Story Telling
      • Script Writing
  • Student Films
    • Advanced Student's movies
    • Beginning Student's movies
  • Links
    • BPA >
      • Futuristic Character >
        • Design and Concept
      • Futuristic Character
    • The Top Six Animation Schools
    • The Top Video Game Design Schools

While Loop

   Every loops has a number pf the same basic elements in it.
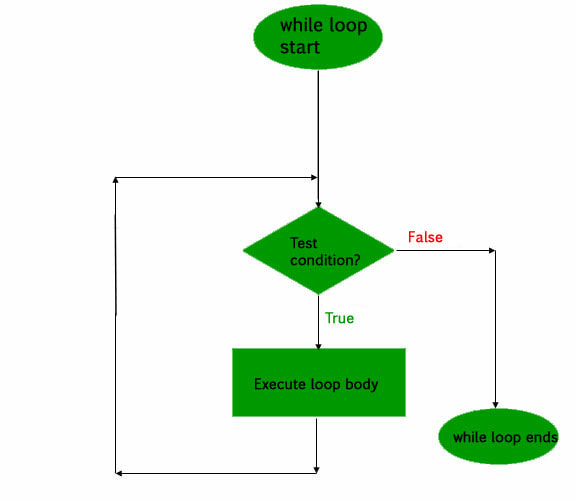
1. A beginning
2. 
An important block of code that needs to be run.
3. A testing condition or statement that judges whether or not to exit the loop.
​4. An end
​


Here is the flowchart of how a While loop functions

Picture

Here is what it looks like in code

While Loop Example

using system;

     class whileLoopDemo
     {
          public static void Main()
          {
               int x = 1;
               while (x <= 4)
               {
                    Console.Writeline("Digitfxtbook.com is amazing!!";
                    x++;
               }
​          }
     }
​
Lets look at what is happening in the code above:
     1. We start off making sure that everything is organized by creating the class and the method That all of this block of code will live inside of.
     2. We then create our counter as an int and name it x
     3. We then create the loop with the "while" statement
     4. Inside the loop we put all of our important lines of code that need to run. In this example we simply out put a line to the console about this web site
     5. Before exiting the loop we increment the counter x adding 1 to it. x++ is the same exact line of code as x = x +1
     6. We then close all of our areas (the loop, the method, and the class) with closed }

Assignment

Starting off with the code above:
1. Create a simple code breaking program using information in the array.
2. This new program should run 54 times.
3. As the program runs it should determine whether our counter is odd or even.
     a. If the counter is on an even number use it to print out the corresponding letter in that place from the array. (remember our friend "modulo" %, it will help you identify which number is even or not)
4. If you code runs correctly then a message should print out to the console and be understandable.
​3. Good luck!!!

Information in the Array

     char[] array1 = new char[] { 'A', 'D', 'Z', 'i', 'n', 'g', 'r', 'i', ';', 't', 'f', 'a', 'Q', 'l', 'S', '_', 'w', 'F', 'J', 'X', 'p', 'T', 'X', '_',  'y', 'b', 'w', 'o', 'b', 'o', 'h', 'k', 'u', '_', 'E', 'i', 'M', 's', '<', '_', '?', 'A', 'k', 'm', 'p', 'a', 'U', 'z', 'A', 'i', 'H', 'n', 'v', 'g' }
Proudly powered by Weebly