Unity VR Development
Virtual reality (VR) is a fast-growing, exciting field with a lot of career opportunities in related disciplines. In this first tutorial, you will learn all about the VR Development pathway, a guided learning experience that prepares you for work in VR development.
1.Overview
Welcome to the VR Development pathway. In this pathway, you will learn the skills necessary for VR development with Unity and C#.
In this tutorial, you will learn what the VR Development pathway is, who it’s for, and how it’s structured.
In this tutorial, you will learn what the VR Development pathway is, who it’s for, and how it’s structured.
2.What is the VR Development pathway?
The VR Development pathway will prepare you for a career in VR development.
In the video below, you’ll meet some established creators in the field and hear directly from them what it’s like to work in this exciting industry.
In the video below, you’ll meet some established creators in the field and hear directly from them what it’s like to work in this exciting industry.
While you work through this pathway, you will immerse yourself in VR. You’ll learn about the industry and how to create compelling VR experiences. You’ll also fill out your portfolio with new, unique VR projects.
With the rapid growth of VR in industries like gaming, entertainment, architecture, training, and education, demand for this skill set has never been higher. According to Hired's 2021 State of Software Engineers report, VR/AR engineers are also among the highest-paid developers.
By the end of this pathway, you will be ready to get a job in VR development.
3.Who is this pathway for?
The VR Development pathway is primarily for people who already have experience programming with Unity and want to apply those skills to VR.
If you want to create simpler VR experiences that do not use any custom code, you can take the Create with VR course. It does not require any programming knowledge.
If you want to work in VR development but don’t have any programming skills, we recommend that you complete the Junior Programmer pathway first or alongside this pathway. The Junior Programmer pathway will give you the fundamentals of programming required to complete this course.
If you are unsure whether your programming skills are strong enough to complete this pathway, you can take this pre-assessment quiz. We will ask you to take this quiz later in the pathway before the tutorials where programming is required.
4.How does VR fit into XR?
Before you commit to this pathway, you should understand how VR fits into the broader world of XR. This will make sure you know what technology you’re getting involved with.
XR
XR is a term that is meant to encompass all of the technologies that blend the real world with the digital one, including the following:
VR
VR creates a digital environment that completely replaces the real-world environment, immersing users in a digital world. VR requires a head-mounted display (HMD), which allows users to look directly at screens through two lenses.
Check out some of the amazing VR games made with Unity:
XR
XR is a term that is meant to encompass all of the technologies that blend the real world with the digital one, including the following:
- VR - Virtual Reality
- AR - Augmented Reality
- MR - Mixed Reality
VR
VR creates a digital environment that completely replaces the real-world environment, immersing users in a digital world. VR requires a head-mounted display (HMD), which allows users to look directly at screens through two lenses.
Check out some of the amazing VR games made with Unity:
AR
AR overlays digitally created content into the user’s real-world environment. Unlike VR, users of AR can still see the real world around them.
Check out some of the AR applications made with Unity in this demo reel:
MR
MR is the broadest term of the three, since it can include elements of AR and VR. It is probably most helpful to think about these technologies along a reality-virtuality continuum, with the real physical environment on one end, and completely virtual environments on the other end.
MR is the broadest term of the three, since it can include elements of AR and VR. It is probably most helpful to think about these technologies along a reality-virtuality continuum, with the real physical environment on one end, and completely virtual environments on the other end.
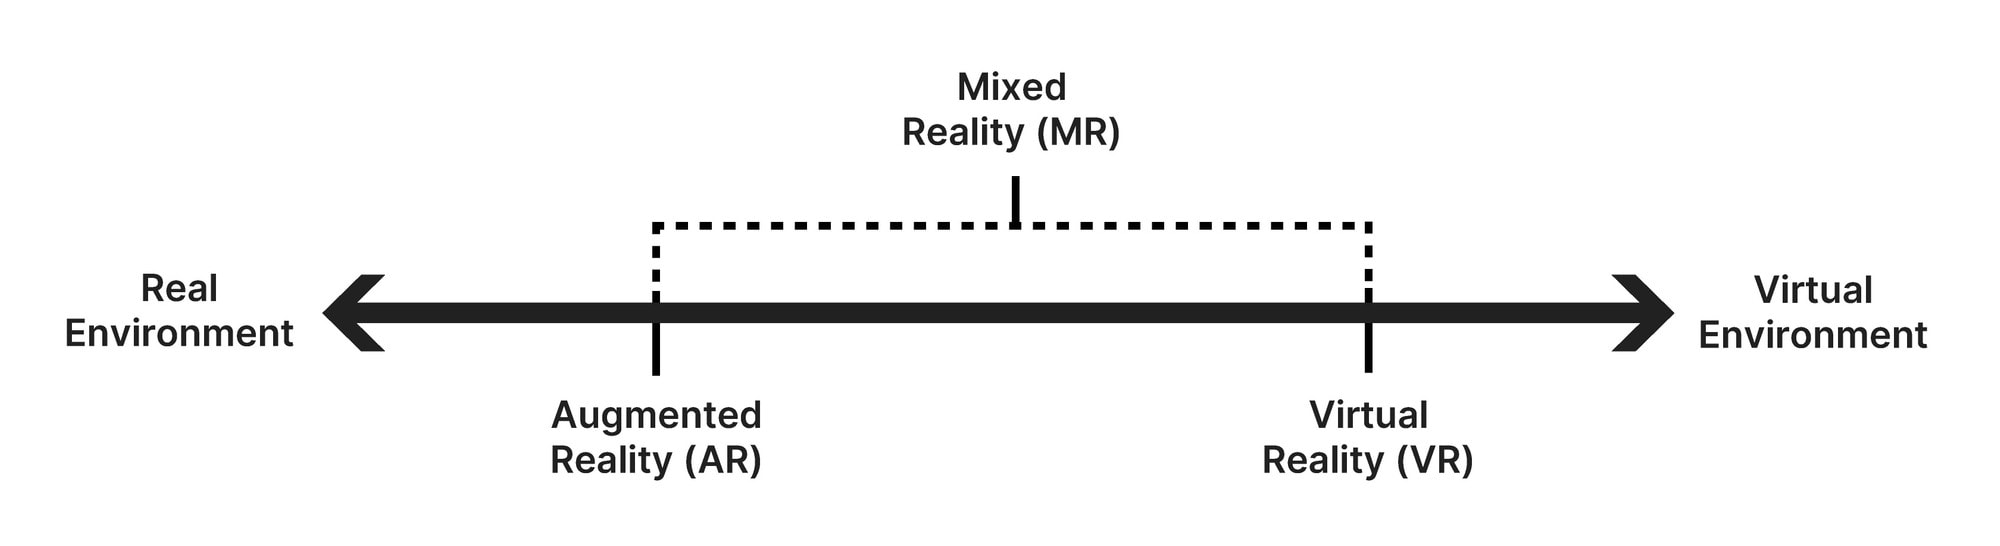
In this framework, VR would land closer to the virtuality end of the spectrum, AR would be closer to the reality end of the spectrum, and MR would include most of the spectrum between the two poles.
In practical terms, there are some applications that are clearly VR and some that are clearly AR. If it doesn’t fall cleanly into one of those two definitions, it is usually referred to as MR.
For example, check out the demo video below. As you’re watching, ask yourself, “Is this VR? Is this AR?” If you can’t really tell, calling it MR is a safe bet!
In this course, we will focus on pure VR, but you’ll learn more about the other technologies and applications of MR and AR along the way too.
If you’re more interested in AR, there’s lots of content available on Unity Learn for you to explore.
If you’re more interested in AR, there’s lots of content available on Unity Learn for you to explore.
5.The career landscape in VR Development
Although this pathway is called VR Development, it can help prepare you for many different overlapping job titles, including the following:
- VR Developer
- VR Designer
- XR Developer / Designer
- Unity Developer
- Immersive Experience Designer
- XR Project Manager or Producer
Although this pathway focuses primarily on VR development and the role of a VR developer, it could help prepare you for any of the jobs listed above.
6.How is the pathway structured?
This VR Development pathway is made up of four missions.
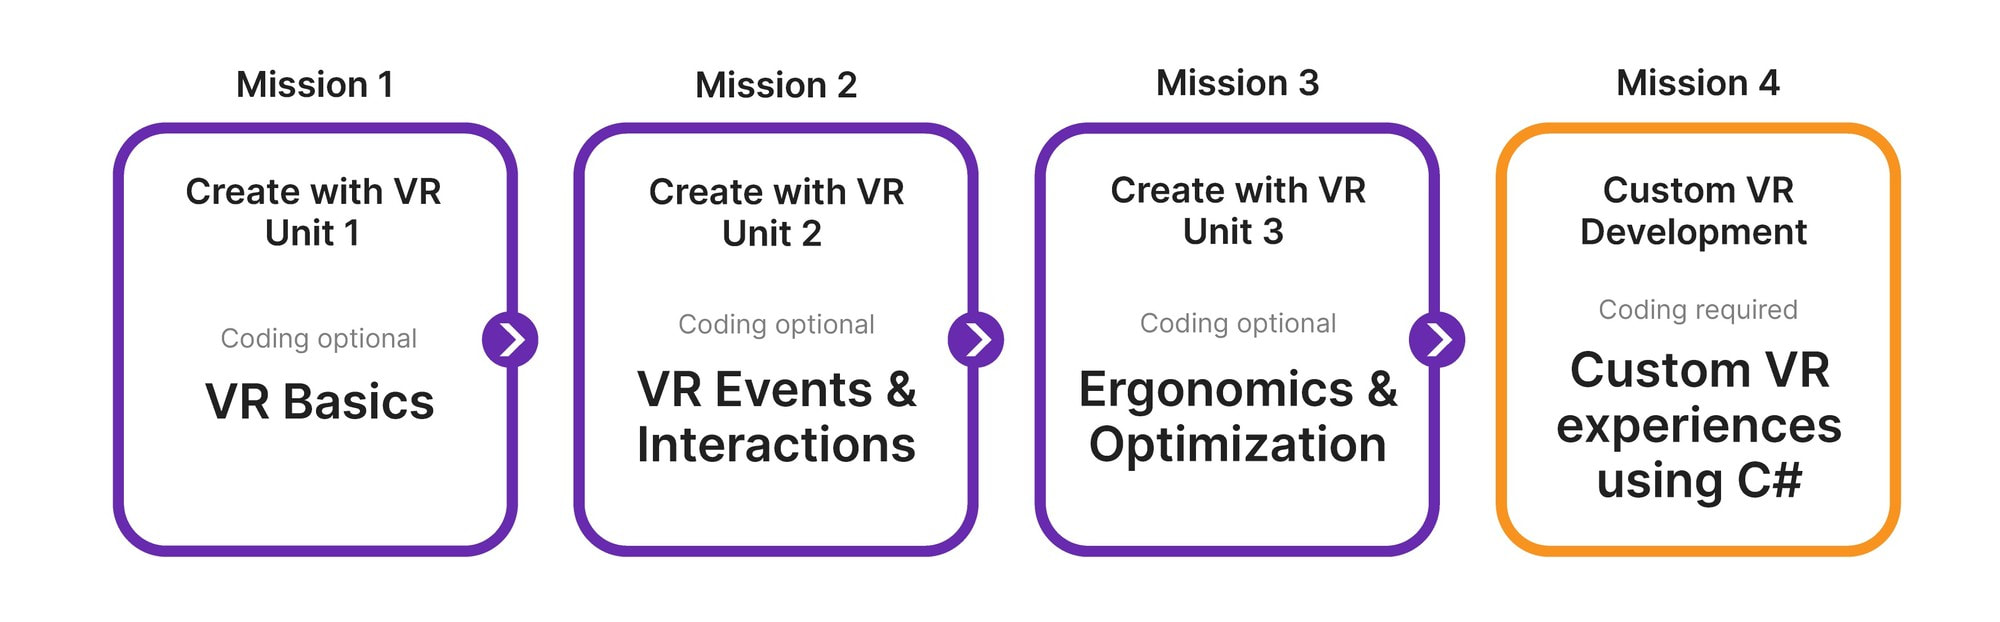
Create with VR (Missions 1-3)
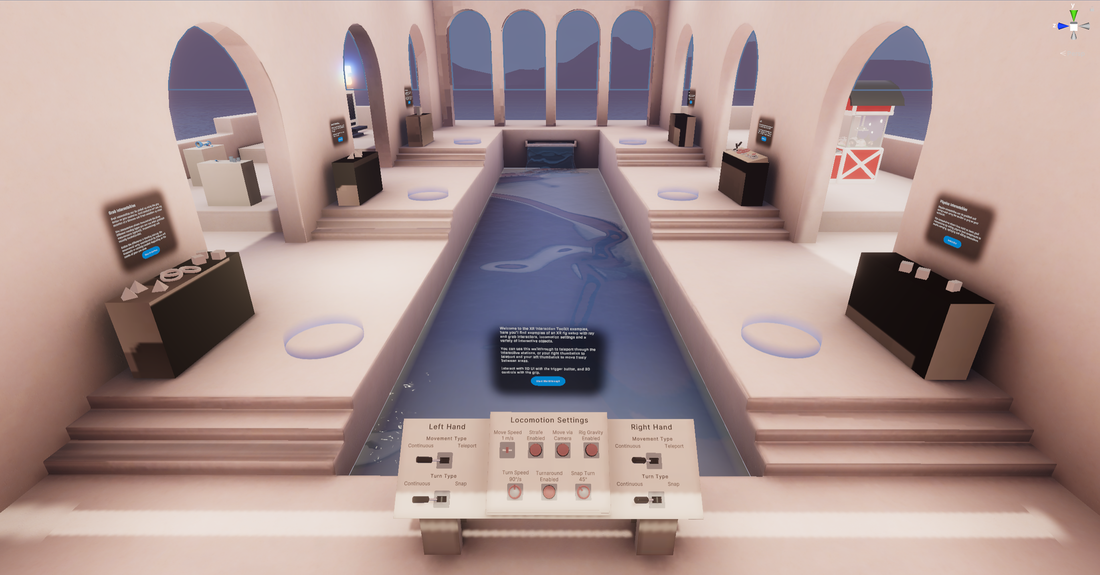
The first three missions contain the Create with VR course content. Here, you will create prototypes, attempt challenges, and complete quizzes. You will also complete a unique VR project from start to finish, beginning with a blank design document and ending with a fully functional project.
Here are screenshots from some of the projects you’ll be working on during the course:

The Create with VR portion of the pathway does not require programming knowledge but includes challenges and extension opportunities for those with programming knowledge to apply their skills.
If you want to learn more, check out the Create with VR promo video:
If you want to learn more, check out the Create with VR promo video:
Custom VR Development (Mission 4)
Mission 4 of the pathway requires programming skills. This mission will start with a coding assessment to make sure you’re ready. Then, you’ll dive straight into applying your programming skills to three new VR environments.
In the first project, you will be given step-by-step instructions on extending Unity’s XR Interaction Toolkit API to create custom interactable objects.
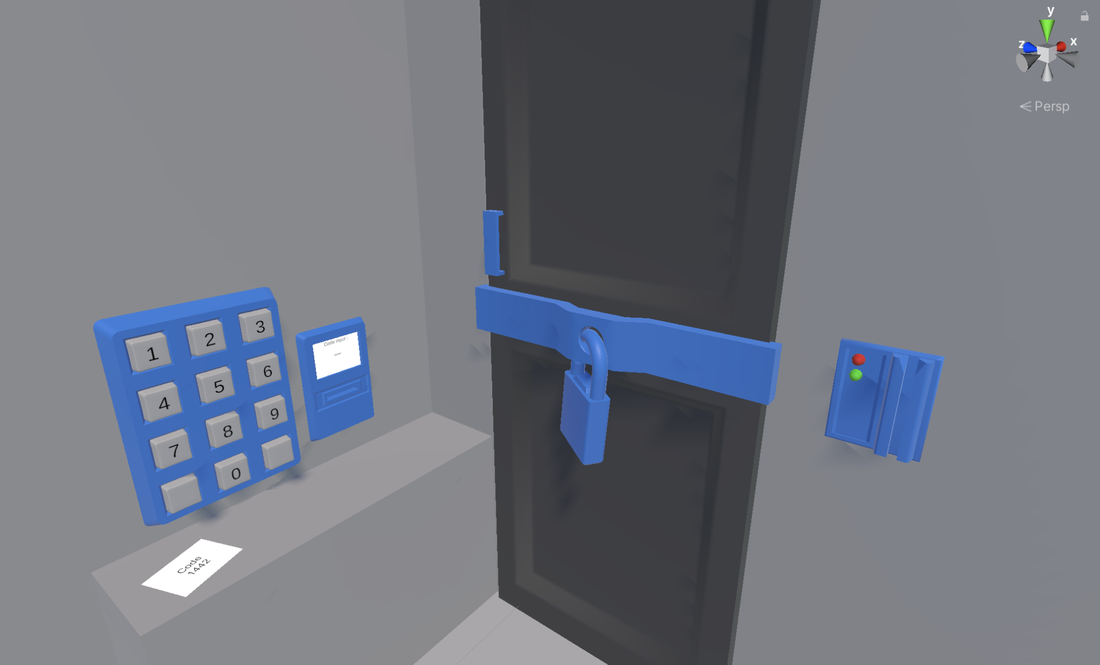
In this second project, your challenge is to develop a portion of a VR escape room. However, you will not be given step-by-step instructions here; you will only be given a project brief, some 3D assets, and a few hints. It will be your job to figure out how to implement the functionality.
For the third project, which you will submit to receive your pathway badge, you will create one final, unique portfolio piece.
Professional skills
Along the way, you’ll also learn professional skills and hear from some of our established creators about how you can best prepare to work in the VR development industry.
Professional skills
Along the way, you’ll also learn professional skills and hear from some of our established creators about how you can best prepare to work in the VR development industry.
7.VR Hardware requirements
A VR headset is not required to complete this pathway. If you don’t have access to a headset, you can use the XR Device Simulator to test your projects. This allows you to use a mouse and keyboard to simulate the movement and inputs of a head-mounted display and controllers.
Using the XR Device Simulator can be difficult and inefficient, and it does not allow you to fully experience your project in VR, so we recommend that you try to get access to a headset if that’s possible.
This learning content has been verified and tested with Oculus/Meta Quest models, so it’s very likely that you will have a smooth experience using one of these headsets.
You can use any other headset that supports OpenXR, including the Valve Index, HTC Vive, and any of the Windows Mixed Reality headsets or Oculus Rift models. Everything should function properly, but this learning content has not been thoroughly tested and verified on these devices.