Digital FXtbook
Easy Contacts
  • Home
    • Software
    • The Author
    • Former Students Hall of Fame
    • A tribute....
  • 3d Training
    • Game Design >
      • Treasure Hunt
      • Unity >
        • Unity's Interface >
          • Our First Assignment
        • Unity Essentials >
          • 3d Gaming Essentials >
            • The Floor is Lava Name Project
          • Introduction to Scripting >
            • Getting Started with Scripting
            • Default Scripting
            • Scripting a Game Object
          • Real Time Audio >
            • Adding Background Music
            • 3-d Audio effects
          • 2d Essentials >
            • 2d Game Objects
            • Objects on 2d Game Objects
        • Creative Core >
          • Introduction to Creative Core
          • Shaders and Materials
          • Lighting
          • Animation
          • VFX
          • Cameras
          • Post Processing
          • Audio
          • User Interface
          • Proto-Typing
      • Maya >
        • Modeling >
          • Introduction: The Temple
          • Name Text Curve
          • Minecraft Steve
          • Minecraft Tools and Weapons
          • Roblox Character modeling
          • Garbage Can
          • Hammer
          • Sword of Light
          • Buzz Axe
          • Halo 1 Blood Gulch Base
          • Hammer
          • Sword
          • Character Modeling Big Daddy
          • Shield
          • The OM6G
          • Weapon
          • Character Modeling Legion the Geth
          • Character Modeling Geth Armor
        • Animation >
          • Character Animation
        • Rigging >
          • Rigging with HumanIK
          • Characterizing and MoCap
          • Integration with Unity
    • Computer Animation >
      • AutoDesk
      • Introduction: The Temple
      • Creating a Film >
        • Scriptwriting and Planning
        • StoryBoarding
        • Story Reels
      • Modeling >
        • The Nail
        • First Freestyle Lesson >
          • Cup and Straw
          • Garbage Can
        • Fence
        • Hammer
        • House
        • Environment Bubble
      • Animation >
        • Beginning Animation
        • Animation - Walk Cycle
        • Facial Animation
      • Rendering >
        • Arnold Rendering
      • Editing film >
        • Credits
        • Video Editing
      • Characters
    • Advanced Modeling and Rigging >
      • Unity VR Development >
        • VR Setup
        • VR 1st Project
      • Modeling and Rigging >
        • Linda Training >
          • Advanced Modeling >
            • Modeling Basics
            • Modeling Room Objects
          • Rigging >
            • Rigging Basics
            • Rigging Creating Skeletons
            • Rigging: Body Controls
            • Rigging: Hands
            • Rigging: Skinning
        • Modeling >
          • Image Planes
          • Polygon Modeling >
            • Coke Can
            • Low Polygon Character
            • Character Modeling Legion the Geth
            • Character Modeling Geth Armor
            • Face Modeling
          • NURBS Modeling >
            • Intro to NURBS
            • Lofting
            • CV Curves
            • Organic Modeling
            • Autombile
        • Texturing
        • Rigging >
          • Rigging with HumanIK
          • Smooth Skinning
        • Motion Capture
        • Blender
      • 3d Animation >
        • Linda Training >
          • Animation - Fundamentals
          • Animation - Next Steps
          • Animation - Pose to Pose
          • Animation - Facial Animation
          • Animation - Lip and Body Animation
        • Arnold Rendering
        • Reference Videos
        • Beginning Animation
        • Characters
  • Coding
    • Unity Coding >
      • Intro to Programming 1 >
        • Player Control 1 >
          • Player Control 1.2
          • Player Control 1.3
          • Player Control 1.4
        • Player Control 2 >
          • Player Control 2.2
          • Player Control 2.3
          • Player Control 2.4
        • Player Control Challenge
      • Intro to Programming 2 >
        • Sound and Effects >
          • Sound and Effects 3.2
          • Sound and Effects 3.3
          • Sound and Effects 3.4
        • GamePlay
        • User Interface
        • Feedback and Testing
        • Next Steps
      • Intro to Programming 3 >
        • Manage Scene Flow and Data
        • Apply Object-Oriented Principles
    • C# Game Scripting >
      • First Program >
        • Getting input from the User
      • Comments >
        • PsuedoCode
      • Variable Types >
        • AlphaNumeric Variables
        • Numeric Variables
        • Putting it all together
      • Operators >
        • Assignment and Arithmetic Operators >
          • Use of Parenthesis
          • Algebra in code and assundry CHAOS
        • Comparison and Logical Operators >
          • Logical Data, Illogical Assignment
        • Operator Assignments >
          • Floats Conversion from Metric to English
          • When is Easter??
        • Random Class
      • Arrays >
        • Simple Arrays
        • Complex Arrays
      • Conditional Statements >
        • Number validator
        • Number tester
        • Speed Camera
      • Loops >
        • For Loops >
          • Adding Numbers
        • For Each Loops
      • Try and Catch
      • Casting
      • Object Oriented Programming
      • U to Me >
        • Introduction Unity Lesson
        • Number Wizard Game #1
        • Second Unity Game: Text Adventure
        • Number Wizard Game GUI >
          • Block Breaker >
            • Block Breaker Game #1
            • Block Breaker Game #2
            • Block Breaker Game #3
            • Block Breaker Game #4
  • Broadcasting
    • Treasure Hunt
    • Audio >
      • Microphones >
        • Construction
        • Patterns
        • Peripherals
      • Mixers >
        • Types and Styles
        • Audio Computer Interfaces
        • Layout and Interface
        • Peripherals
        • Cords
      • PodCasting >
        • Setup and Operation
        • PodCasting Assignment
      • Boom Operating >
        • Equipment
        • Setup and Operation
    • Video >
      • Cameras >
        • Construction
        • Layout and Interface
        • Types and Styles >
          • Photography
          • Video
          • PTZ and Interfaces
      • Peripherals >
        • Power
        • Cords
        • Stabilizers >
          • Tripods and Chest Rigs
          • Gimbals and Sliders
        • Transmitting Wirelessly
      • Live Broadcasting >
        • Computer Interface >
          • Audio
          • Video
        • Streaming >
          • OBS
          • StreamYards
          • Software
      • Pre-Recorded >
        • Editing >
          • Premier >
            • Chapter 1
            • Chapter 2
            • Chapter 3
            • Editing A-Roll
            • Chapter 4
            • Editing B-Roll
            • Chapter 5
            • Chapter 6
            • Chapter 7
            • Chapter 8
            • Chapter 9
            • Chapter 10
            • Chapter 11
            • Chapter 12
    • Journalism >
      • Story Telling
      • Script Writing
  • Student Films
    • Advanced Student's movies
    • Beginning Student's movies
  • Links
    • BPA >
      • Futuristic Character >
        • Design and Concept
      • Futuristic Character
    • The Top Six Animation Schools
    • The Top Video Game Design Schools

For Loop

   Every loops has a number pf the same basic elements in it. 
1. A beginning
2. 
An important block of code that needs to be run.
3. A testing condition or statement that judges whether or not to exit the loop.
​4. An end

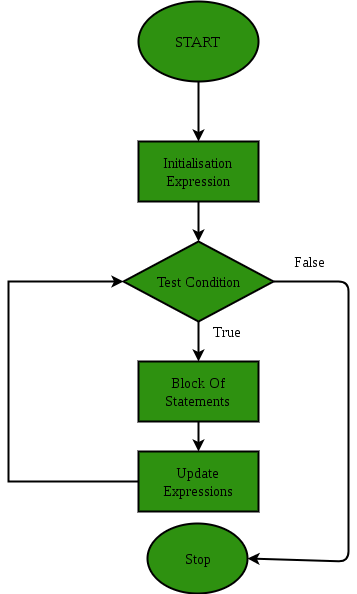
A For loop changes the recipe from the While loop slightly. In the beginning of the For loop we initialize everything thing. I love this structure because it allows me to make sure that I am getting everything in the loop at the beginning so that I don't forget a piece later. It then runs along and treats the block of code as it own element.
Picture
Here is what the for loop looks like in code:
​

using System;
  
class forLoopDemo
{
    public static void Main()
    {
        for (int x = 1; x <= 4; x++)
            Console.WriteLine("DigitalfxtBook.com is amazing");
    }
}

Explanation of the code

So lets look at exactly what this code is doing:
1. We create our organization with the Class (forLoopDemo) and the Method (public static void Main())
​2. We then initialize the loop with three statements
     1. int x = 1 (this is our counter)
     2. x <= 4 (this is our condition testing to see if our loop has run for at least 4 times)
     3. x++ (this increments our counter up by one)
   Soooo in essence this one statement gets everything set up.
     The establishment of our counter only happens once.
     Every time the loop cycles through the test is run to make sure that the loop is going to happen one more time.
     At the end of the loop the counter gets incremented.
3. Now that the loop has been initialized we can run the important block of code inside of it.


Assignment

So in this lesson what you are going to create is:
1.
Write a program that prints out ever odd number between 0 and 30.
​

Here are some helpful hints to accomplish this lesson

1. In the video above you were supposed to print out every even number
​2. we need it to print out every number not even....

​
Proudly powered by Weebly