Digital FXtbook
Easy Contacts
  • Home
    • Software
    • The Author
    • Former Students Hall of Fame
    • A tribute....
    • Treasure Hunt
  • Video Game Training
    • 3d Motion Graphics >
      • Unity >
        • Unity Essentials >
          • Unity's Interface >
            • Our First Assignment
          • Modeling and Level Design >
            • The Essentials
            • The Floor is Lava Name Project
            • ProBuilder >
              • ProBuilder Image Planes
              • ProBuilder Steve Modeling
              • ProBuilder Steve Texturing
          • Programming >
            • Getting Started with Scripting
            • Default Scripting
            • Scripting a Game Object
          • Real Time Audio >
            • Adding Background Music
            • 3-d Audio effects
          • 2d Essentials >
            • 2d Game Objects
            • Objects on 2d Game Objects
        • Creative Core >
          • Introduction to Creative Core
          • Shaders and Materials
          • Lighting
          • Animation
          • VFX
          • Cameras
          • Post Processing
          • Audio
          • User Interface
          • Proto-Typing
    • C# Programming >
      • Visual Studios >
        • First Program >
          • Getting input from the User
        • Comments >
          • PsuedoCode
        • Variable Types >
          • AlphaNumeric Variables
          • Numeric Variables
          • Putting it all together
        • Operators >
          • Assignment and Arithmetic Operators >
            • Use of Parenthesis
            • When is Easter??
          • Comparison and Logical Operators >
            • Logical Data, Illogical Assignment
          • Random Class
        • Conditional Statements >
          • Number validator
          • Number tester
          • Speed Camera
        • Loops >
          • For Loops >
            • Adding Numbers
          • For Each Loops
        • Arrays >
          • Simple Arrays
          • Complex Arrays
      • Intro to Unity >
        • Unity Essentials >
          • Unity's Interface
          • The Essentials
          • Programming >
            • Getting Started with Scripting
            • Default Scripting
            • Scripting a Game Object
        • Intro to Programming 1 >
          • Player Control 1 >
            • Player Control 1.2
            • Player Control 1.3
            • Player Control 1.4
          • Player Control 2 >
            • Player Control 2.2
            • Player Control 2.3
            • Player Control 2.4
          • Player Control Challenge
        • Intro to Programming 2 >
          • Sound and Effects >
            • Sound and Effects 3.2
            • Sound and Effects 3.3
            • Sound and Effects 3.4
          • GamePlay
          • User Interface
          • Feedback and Testing
          • Next Steps
        • Intro to Programming 3 >
          • Manage Scene Flow and Data
          • Apply Object-Oriented Principles
    • Modeling and Rigging >
      • Modeling >
        • Introduction: The Temple
        • Name Text Curve
        • Character Modeling >
          • Minecraft Steve
          • Minecraft Steve UV
          • Roblox Character modeling
          • Big Daddy
          • Demon School Iruma-kun
          • Character Modeling Legion the Geth
          • Character Modeling Geth Armor
        • Weapons >
          • Minecraft Tools and Weapons
          • Minecraft Movie Pickaxe
          • Minecraft Movie Sword
          • Thor's Hammer
          • Hammer
          • LOL Sword
          • Sword of Light
          • Buzz Axe
          • Weapon
      • Rigging >
        • Intro to Rigging
        • Controls
        • Rigging Basics
        • Rigging Creating Skeletons
        • Rigging: Body Controls
        • Rigging: Hands
        • Rigging: Skinning
        • Smooth Skinning
    • Advanced >
      • Modeling >
        • Image Planes
        • Polygon Modeling >
          • Coke Can
          • Low Polygon Character
          • Character Modeling Legion the Geth
          • Character Modeling Geth Armor
          • Face Modeling
        • NURBS Modeling >
          • Intro to NURBS
          • Lofting
          • CV Curves
          • Organic Modeling
          • Autombile
      • Linda Training >
        • Advanced Modeling >
          • Modeling Basics
          • Modeling Room Objects
      • Texturing
      • Rigging >
        • Rigging with HumanIK
        • Smooth Skinning
  • Student Films
    • Advanced Student's movies
    • Beginning Student's movies
  • Links
    • BPA
    • The Top Six Animation Schools
    • The Top Video Game Design Schools

Basic GamePlay

Picture
In this Unit, you will program a top-down game with the objective of throwing food to hungry animals - who are stampeding towards you - before they can run past you. In order to do this, you will become much more familiar with some of the most important programming and Unity concepts, including if-then statements, random value generation, arrays, collision detection, prefabs, and instantiation. In completing this Unit, you will learn how to program a basic game with the ability to launch projectiles and maneuver the player to keep the game alive.


​Create a new Project for Prototype 2

  1. Open Unity Hub and create an empty “Prototype 2” project in your course directory on the correct Unity version. If you forget how to do this, refer to the instructions in Lesson 1.1 - Step 1
  2. Click to download the Prototype 2 Starter Files, extract the compressed folder, and then import the .unitypackage into your project. If you forget how to do this, refer to the instructions in Lesson 1.1 - Step 2
  3. From the Project window, open the Prototype 2 scene and delete the SampleScene
  4. In the top-right of the Unity Editor, change your Layout from Default to your custom layout

​Add the Player, Animals, and Food

  1. If you want, drag a different material from Course Library > Materials onto the Ground object
  2. Drag 1 Human, 3 Animals, and 1 Food object into the Hierarchy
  3. Rename the character “Player”, then reposition the animals and food so you can see them
  4. Adjust the XYZ scale of the food so you can easily see it from above

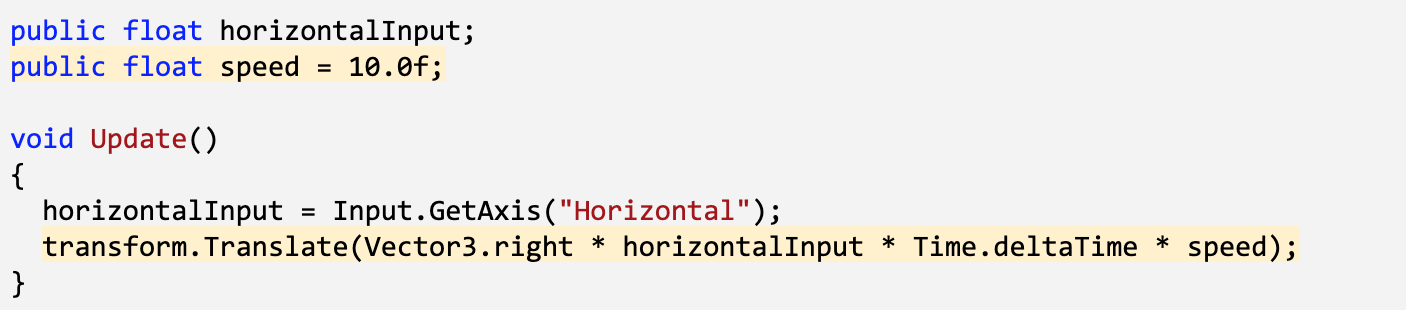
​Get the user’s horizontal input

  1. In your Assets folder, create a “Scripts” folder, and a “PlayerController” script inside
  2. Attach the script to the Player and open it
  3. At the top of PlayerController.cs, declare a new public float horizontalInput
  4. In Update(), set horizontalInput = Input.GetAxis(“Horizontal”), then test to make sure it works in the inspector
Picture

​Move the player left-to-right

  1. Declare a new public float speed = 10.0f;
  2. In Update(), Translate the player side-to-side based on horizontalInput and speed
Picture

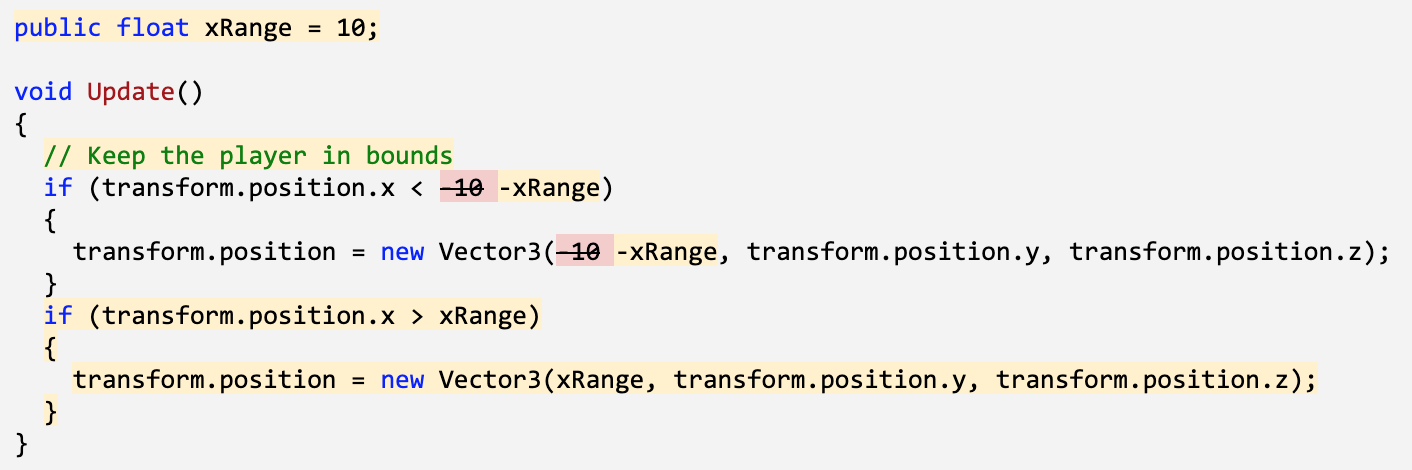
​Keep the player inbounds

​
  1. In Update(), write an if-statement checking if the player’s left X position is less than a certain value
  2. In the if-statement, set the player’s position to its current position, but with a fixed X location
Picture

​Clean up your code and variables

  1. Repeat this process for the right side of the screen
  2. Declare new xRange variable, then replace the hardcoded values with them
  3. Add comments to your code
Picture
Onto the next page
Proudly powered by Weebly