Digital FXtbook
Easy Contacts
  • Home
    • Software
    • The Author
    • Former Students Hall of Fame
    • A tribute....
  • 3d Training
    • Game Design >
      • Treasure Hunt
      • Unity >
        • Unity's Interface >
          • Our First Assignment
        • Unity Essentials >
          • 3d Gaming Essentials >
            • The Floor is Lava Name Project
          • Introduction to Scripting >
            • Getting Started with Scripting
            • Default Scripting
            • Scripting a Game Object
          • Real Time Audio >
            • Adding Background Music
            • 3-d Audio effects
          • 2d Essentials >
            • 2d Game Objects
            • Objects on 2d Game Objects
        • Creative Core >
          • Introduction to Creative Core
          • Shaders and Materials
          • Lighting
          • Animation
          • VFX
          • Cameras
          • Post Processing
          • Audio
          • User Interface
          • Proto-Typing
      • Maya >
        • Modeling >
          • Introduction: The Temple
          • Name Text Curve
          • Minecraft Steve
          • Minecraft Tools and Weapons
          • Roblox Character modeling
          • Garbage Can
          • Hammer
          • Sword of Light
          • Buzz Axe
          • Halo 1 Blood Gulch Base
          • Hammer
          • Sword
          • Character Modeling Big Daddy
          • Shield
          • The OM6G
          • Weapon
          • Character Modeling Legion the Geth
          • Character Modeling Geth Armor
        • Animation >
          • Character Animation
        • Rigging >
          • Rigging with HumanIK
          • Characterizing and MoCap
          • Integration with Unity
    • Computer Animation >
      • AutoDesk
      • Introduction: The Temple
      • Creating a Film >
        • Scriptwriting and Planning
        • StoryBoarding
        • Story Reels
      • Modeling >
        • The Nail
        • First Freestyle Lesson >
          • Cup and Straw
          • Garbage Can
        • Fence
        • Hammer
        • House
        • Environment Bubble
      • Animation >
        • Beginning Animation
        • Animation - Walk Cycle
        • Facial Animation
      • Rendering >
        • Arnold Rendering
      • Editing film >
        • Credits
        • Video Editing
      • Characters
    • Advanced Modeling and Rigging >
      • Unity VR Development >
        • VR Setup
        • VR 1st Project
      • Modeling and Rigging >
        • Linda Training >
          • Advanced Modeling >
            • Modeling Basics
            • Modeling Room Objects
          • Rigging >
            • Rigging Basics
            • Rigging Creating Skeletons
            • Rigging: Body Controls
            • Rigging: Hands
            • Rigging: Skinning
        • Modeling >
          • Image Planes
          • Polygon Modeling >
            • Coke Can
            • Low Polygon Character
            • Character Modeling Legion the Geth
            • Character Modeling Geth Armor
            • Face Modeling
          • NURBS Modeling >
            • Intro to NURBS
            • Lofting
            • CV Curves
            • Organic Modeling
            • Autombile
        • Texturing
        • Rigging >
          • Rigging with HumanIK
          • Smooth Skinning
        • Motion Capture
        • Blender
      • 3d Animation >
        • Linda Training >
          • Animation - Fundamentals
          • Animation - Next Steps
          • Animation - Pose to Pose
          • Animation - Facial Animation
          • Animation - Lip and Body Animation
        • Arnold Rendering
        • Reference Videos
        • Beginning Animation
        • Characters
  • Coding
    • Unity Coding >
      • Intro to Programming 1 >
        • Player Control 1 >
          • Player Control 1.2
          • Player Control 1.3
          • Player Control 1.4
        • Player Control 2 >
          • Player Control 2.2
          • Player Control 2.3
          • Player Control 2.4
        • Player Control Challenge
      • Intro to Programming 2 >
        • Sound and Effects >
          • Sound and Effects 3.2
          • Sound and Effects 3.3
          • Sound and Effects 3.4
        • GamePlay
        • User Interface
        • Feedback and Testing
        • Next Steps
      • Intro to Programming 3 >
        • Manage Scene Flow and Data
        • Apply Object-Oriented Principles
    • C# Game Scripting >
      • First Program >
        • Getting input from the User
      • Comments >
        • PsuedoCode
      • Variable Types >
        • AlphaNumeric Variables
        • Numeric Variables
        • Putting it all together
      • Operators >
        • Assignment and Arithmetic Operators >
          • Use of Parenthesis
          • Algebra in code and assundry CHAOS
        • Comparison and Logical Operators >
          • Logical Data, Illogical Assignment
        • Operator Assignments >
          • Floats Conversion from Metric to English
          • When is Easter??
        • Random Class
      • Arrays >
        • Simple Arrays
        • Complex Arrays
      • Conditional Statements >
        • Number validator
        • Number tester
        • Speed Camera
      • Loops >
        • For Loops >
          • Adding Numbers
        • For Each Loops
      • Try and Catch
      • Casting
      • Object Oriented Programming
      • U to Me >
        • Introduction Unity Lesson
        • Number Wizard Game #1
        • Second Unity Game: Text Adventure
        • Number Wizard Game GUI >
          • Block Breaker >
            • Block Breaker Game #1
            • Block Breaker Game #2
            • Block Breaker Game #3
            • Block Breaker Game #4
  • Broadcasting
    • Treasure Hunt
    • Audio >
      • Microphones >
        • Construction
        • Patterns
        • Peripherals
      • Mixers >
        • Types and Styles
        • Audio Computer Interfaces
        • Layout and Interface
        • Peripherals
        • Cords
      • PodCasting >
        • Setup and Operation
        • PodCasting Assignment
      • Boom Operating >
        • Equipment
        • Setup and Operation
    • Video >
      • Cameras >
        • Construction
        • Layout and Interface
        • Types and Styles >
          • Photography
          • Video
          • PTZ and Interfaces
      • Peripherals >
        • Power
        • Cords
        • Stabilizers >
          • Tripods and Chest Rigs
          • Gimbals and Sliders
        • Transmitting Wirelessly
      • Live Broadcasting >
        • Computer Interface >
          • Audio
          • Video
        • Streaming >
          • OBS
          • StreamYards
          • Software
      • Pre-Recorded >
        • Editing >
          • Premier >
            • Chapter 1
            • Chapter 2
            • Chapter 3
            • Editing A-Roll
            • Chapter 4
            • Editing B-Roll
            • Chapter 5
            • Chapter 6
            • Chapter 7
            • Chapter 8
            • Chapter 9
            • Chapter 10
            • Chapter 11
            • Chapter 12
    • Journalism >
      • Story Telling
      • Script Writing
  • Student Films
    • Advanced Student's movies
    • Beginning Student's movies
  • Links
    • BPA >
      • Futuristic Character >
        • Design and Concept
    • The Top Six Animation Schools
    • The Top Video Game Design Schools

Rigging with HumanIK

HumanIk is a really neat rigging process that allows the user to throw a skeleton into a character quickly. At its core level it is not necessarily an amazing replacement for professional level rigging. At a higher level it allows you to assign bones designations that Motion Capture systems can work with easily. Therein lies our purpose for it. 


We will use the initial rigging system in this project to facilitate anyone that hasn't had the opportunity to take a rigging class before as it is quick and relatively simple. If you would like to use training that you have received in a rigging class to prepare a more amazing skeleton feel free to do so. But in so doing please understand that you have ventured beyond the fence line of this class, and you are on your own.

Picture
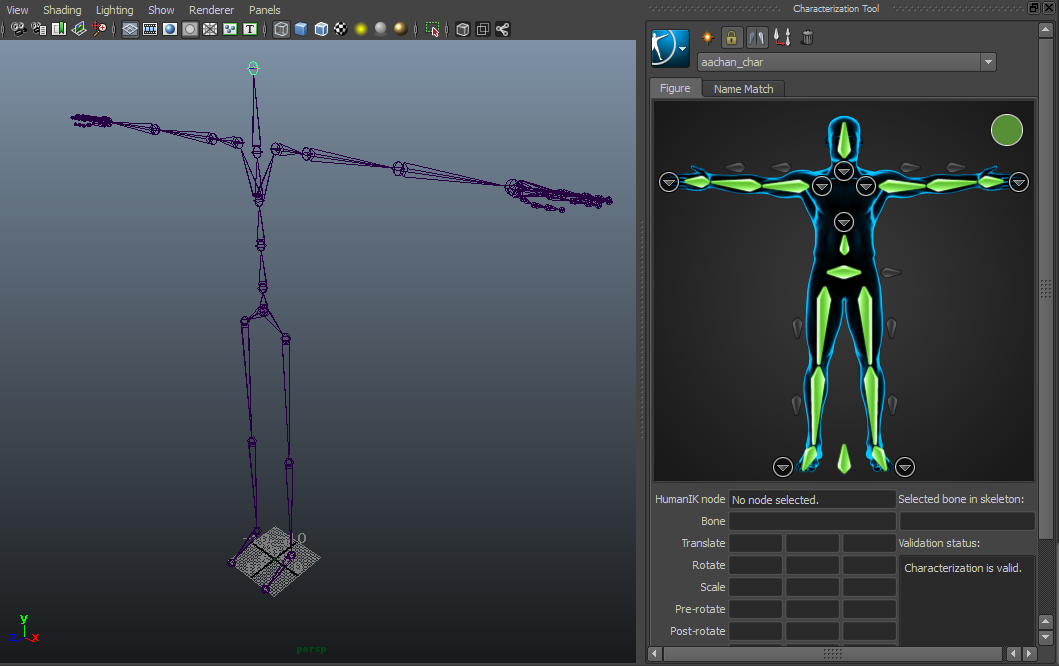
In the image above you can see the simple rigging/bones set up that we will use on the Left hand side


Enough said lets get to work!!!


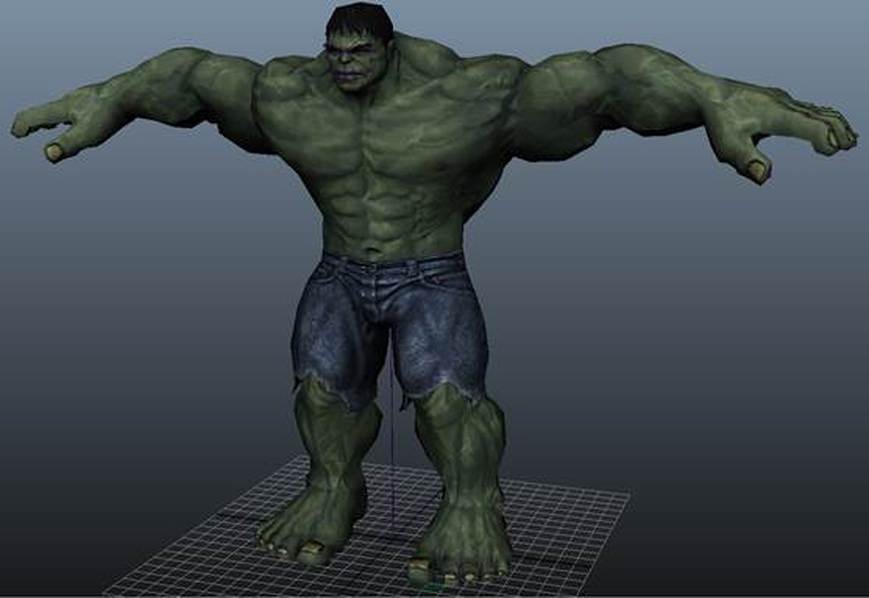
Here is what our example model looks like

Picture

Here is the file that you need

hulkfixed.mb
File Size: 433 kb
File Type: mb
Download File

The texture files

When you finish downloading all of these files put them and the hulk file into a folder
hulk_body_b.tga
File Size: 12582 kb
File Type: tga
Download File

hulk_body_o.tga
File Size: 12582 kb
File Type: tga
Download File

hulk_body_s.tga
File Size: 12582 kb
File Type: tga
Download File

hulk_hair_d.tga
File Size: 2097 kb
File Type: tga
Download File

hulk_body_d.tga
File Size: 16777 kb
File Type: tga
Download File

hulk_body_n.tga
File Size: 12582 kb
File Type: tga
Download File

hulk_hair_b.tga
File Size: 1572 kb
File Type: tga
Download File

hulk_hair_o.tga
File Size: 1572 kb
File Type: tga
Download File

hulk_hair_s.tga
File Size: 1572 kb
File Type: tga
Download File

Here is the video training

Proudly powered by Weebly