Digital FXtbook
Easy Contacts
  • Home
    • Software
    • The Author
    • Former Students Hall of Fame
    • A tribute....
  • 3d Training
    • Game Design >
      • Treasure Hunt
      • Unity >
        • Unity's Interface >
          • Our First Assignment
        • Unity Essentials >
          • 3d Gaming Essentials >
            • The Floor is Lava Name Project
          • Introduction to Scripting >
            • Getting Started with Scripting
            • Default Scripting
            • Scripting a Game Object
          • Real Time Audio >
            • Adding Background Music
            • 3-d Audio effects
          • 2d Essentials >
            • 2d Game Objects
            • Objects on 2d Game Objects
        • Creative Core >
          • Introduction to Creative Core
          • Shaders and Materials
          • Lighting
          • Animation
          • VFX
          • Cameras
          • Post Processing
          • Audio
          • User Interface
          • Proto-Typing
      • Maya >
        • Modeling >
          • Introduction: The Temple
          • Name Text Curve
          • Minecraft Steve
          • Minecraft Tools and Weapons
          • Roblox Character modeling
          • Garbage Can
          • Hammer
          • Sword of Light
          • Buzz Axe
          • Halo 1 Blood Gulch Base
          • Hammer
          • Sword
          • Character Modeling Big Daddy
          • Shield
          • The OM6G
          • Weapon
          • Character Modeling Legion the Geth
          • Character Modeling Geth Armor
        • Animation >
          • Character Animation
        • Rigging >
          • Rigging with HumanIK
          • Characterizing and MoCap
          • Integration with Unity
    • Computer Animation >
      • AutoDesk
      • Introduction: The Temple
      • Creating a Film >
        • Scriptwriting and Planning
        • StoryBoarding
        • Story Reels
      • Modeling >
        • The Nail
        • First Freestyle Lesson >
          • Cup and Straw
          • Garbage Can
        • Fence
        • Hammer
        • House
        • Environment Bubble
      • Animation >
        • Beginning Animation
        • Animation - Walk Cycle
        • Facial Animation
      • Rendering >
        • Arnold Rendering
      • Editing film >
        • Credits
        • Video Editing
      • Characters
    • Advanced Modeling and Rigging >
      • Unity VR Development >
        • VR Setup
        • VR 1st Project
      • Modeling and Rigging >
        • Linda Training >
          • Advanced Modeling >
            • Modeling Basics
            • Modeling Room Objects
          • Rigging >
            • Rigging Basics
            • Rigging Creating Skeletons
            • Rigging: Body Controls
            • Rigging: Hands
            • Rigging: Skinning
        • Modeling >
          • Image Planes
          • Polygon Modeling >
            • Coke Can
            • Low Polygon Character
            • Character Modeling Legion the Geth
            • Character Modeling Geth Armor
            • Face Modeling
          • NURBS Modeling >
            • Intro to NURBS
            • Lofting
            • CV Curves
            • Organic Modeling
            • Autombile
        • Texturing
        • Rigging >
          • Rigging with HumanIK
          • Smooth Skinning
        • Motion Capture
        • Blender
      • 3d Animation >
        • Linda Training >
          • Animation - Fundamentals
          • Animation - Next Steps
          • Animation - Pose to Pose
          • Animation - Facial Animation
          • Animation - Lip and Body Animation
        • Arnold Rendering
        • Reference Videos
        • Beginning Animation
        • Characters
  • Coding
    • Unity Coding >
      • Intro to Programming 1 >
        • Player Control 1 >
          • Player Control 1.2
          • Player Control 1.3
          • Player Control 1.4
        • Player Control 2 >
          • Player Control 2.2
          • Player Control 2.3
          • Player Control 2.4
        • Player Control Challenge
      • Intro to Programming 2 >
        • Sound and Effects >
          • Sound and Effects 3.2
          • Sound and Effects 3.3
          • Sound and Effects 3.4
        • GamePlay
        • User Interface
        • Feedback and Testing
        • Next Steps
      • Intro to Programming 3 >
        • Manage Scene Flow and Data
        • Apply Object-Oriented Principles
    • C# Game Scripting >
      • First Program >
        • Getting input from the User
      • Comments >
        • PsuedoCode
      • Variable Types >
        • AlphaNumeric Variables
        • Numeric Variables
        • Putting it all together
      • Operators >
        • Assignment and Arithmetic Operators >
          • Use of Parenthesis
          • Algebra in code and assundry CHAOS
        • Comparison and Logical Operators >
          • Logical Data, Illogical Assignment
        • Operator Assignments >
          • Floats Conversion from Metric to English
          • When is Easter??
        • Random Class
      • Arrays >
        • Simple Arrays
        • Complex Arrays
      • Conditional Statements >
        • Number validator
        • Number tester
        • Speed Camera
      • Loops >
        • For Loops >
          • Adding Numbers
        • For Each Loops
      • Try and Catch
      • Casting
      • Object Oriented Programming
      • U to Me >
        • Introduction Unity Lesson
        • Number Wizard Game #1
        • Second Unity Game: Text Adventure
        • Number Wizard Game GUI >
          • Block Breaker >
            • Block Breaker Game #1
            • Block Breaker Game #2
            • Block Breaker Game #3
            • Block Breaker Game #4
  • Broadcasting
    • Treasure Hunt
    • Audio >
      • Microphones >
        • Construction
        • Patterns
        • Peripherals
      • Mixers >
        • Types and Styles
        • Audio Computer Interfaces
        • Layout and Interface
        • Peripherals
        • Cords
      • PodCasting >
        • Setup and Operation
        • PodCasting Assignment
      • Boom Operating >
        • Equipment
        • Setup and Operation
    • Video >
      • Cameras >
        • Construction
        • Layout and Interface
        • Types and Styles >
          • Photography
          • Video
          • PTZ and Interfaces
      • Peripherals >
        • Power
        • Cords
        • Stabilizers >
          • Tripods and Chest Rigs
          • Gimbals and Sliders
        • Transmitting Wirelessly
      • Live Broadcasting >
        • Computer Interface >
          • Audio
          • Video
        • Streaming >
          • OBS
          • StreamYards
          • Software
      • Pre-Recorded >
        • Editing >
          • Premier >
            • Chapter 1
            • Chapter 2
            • Chapter 3
            • Editing A-Roll
            • Chapter 4
            • Editing B-Roll
            • Chapter 5
            • Chapter 6
            • Chapter 7
            • Chapter 8
            • Chapter 9
            • Chapter 10
            • Chapter 11
            • Chapter 12
    • Journalism >
      • Story Telling
      • Script Writing
  • Student Films
    • Advanced Student's movies
    • Beginning Student's movies
  • Links
    • BPA >
      • Futuristic Character >
        • Design and Concept
    • The Top Six Animation Schools
    • The Top Video Game Design Schools

Lesson 3.3 - Don't Just Stand There


Explore the player’s animations

  1. Double-click on the Player’s Animation Controller, then explore the different Layers, double-clicking on States to see their animations and Transitions to see their conditions
    ​

Make the player start off at a run

  1. In the Parameters tab, change the Speed_f variable to 1.0
  2. Right-click on Run_Static > Set as Layer Default State
  3. Single-click the the Run_Static state and adjust the Speed value in the inspector to match the speed of the background

Set up a jump animation

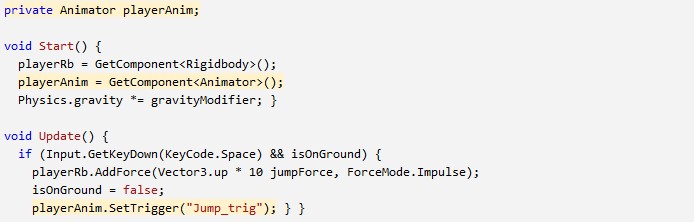
  1. In PlayerController.cs, declare a new private Animator playerAnim;
  2. In Start(), set playerAnim = GetComponent<Animator>();
  3. In the if-statement for when the player jumps, trigger the jump: playerAnim.SetTrigger(“Jump_trig”);
Picture

Adjust the jump animation

​
  1. In the Animator window, click on the Running_Jump state, then in the inspector and reduce its Speed value to slow down the animation
  2. Adjust the player’s mass, jump force, and gravity modifier to get your jump just right

Set up a falling animation

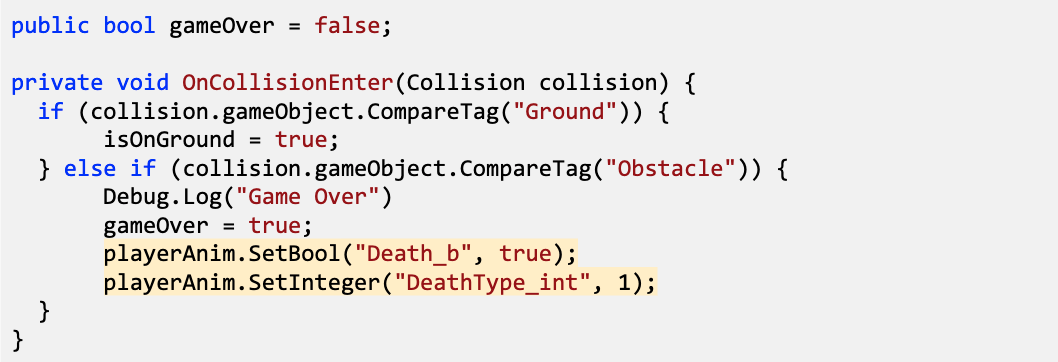
  1. In the condition that player collides with Obstacle, set the Death bool to true
  2. In the same if-statement, set the DeathType integer to 1

Picture

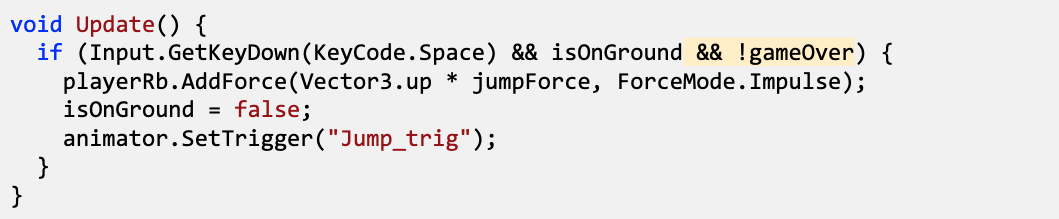
Keep player from unconscious jumping

  1. To prevent the player from jumping while unconscious, add && !gameOver to the jump condition
Picture
Onto the next page
Proudly powered by Weebly