Digital FXtbook
Easy Contacts
  • Home
    • Software
    • The Author
    • Former Students Hall of Fame
    • A tribute....
    • Treasure Hunt
  • Video Game Training
    • 3d Motion Graphics >
      • Unity >
        • Unity Essentials >
          • Unity's Interface >
            • Our First Assignment
          • Modeling and Level Design >
            • The Essentials
            • The Floor is Lava Name Project
            • ProBuilder >
              • ProBuilder Pro Skater Park
              • ProBuilder Pro Skater Park 2
              • ProBuilder Image Planes
              • ProBuilder Steve Modeling
              • ProBuilder Steve Texturing
          • Programming >
            • Getting Started with Scripting
            • Default Scripting
            • Scripting a Game Object
          • Real Time Audio >
            • Adding Background Music
            • 3-d Audio effects
          • 2d Essentials >
            • 2d Game Objects
            • Objects on 2d Game Objects
        • Creative Core >
          • Introduction to Creative Core
          • Shaders and Materials
          • Lighting
          • Animation
          • VFX
          • Cameras
          • Post Processing
          • Audio
          • User Interface
          • Proto-Typing
    • C# Programming >
      • Visual Studios >
        • First Program >
          • Getting input from the User
        • Comments >
          • PsuedoCode
        • Variable Types >
          • AlphaNumeric Variables
          • Numeric Variables
          • Putting it all together
        • Operators >
          • Assignment and Arithmetic Operators >
            • Use of Parenthesis
            • When is Easter??
          • Comparison and Logical Operators >
            • Logical Data, Illogical Assignment
          • Random Class
        • Conditional Statements >
          • Number validator
          • Number tester
          • Speed Camera
        • Loops >
          • For Loops >
            • Adding Numbers
          • For Each Loops
        • Arrays >
          • Simple Arrays
          • Complex Arrays
      • Intro to Unity >
        • Unity Essentials >
          • Unity's Interface
          • The Essentials
          • Programming >
            • Getting Started with Scripting
            • Default Scripting
            • Scripting a Game Object
        • Intro to Programming 1 >
          • Player Control 1 >
            • Player Control 1.2
            • Player Control 1.3
            • Player Control 1.4
          • Player Control 2 >
            • Player Control 2.2
            • Player Control 2.3
            • Player Control 2.4
          • Player Control Challenge
        • Intro to Programming 2 >
          • Sound and Effects >
            • Sound and Effects 3.2
            • Sound and Effects 3.3
            • Sound and Effects 3.4
          • GamePlay
          • User Interface
          • Feedback and Testing
          • Next Steps
        • Intro to Programming 3 >
          • Manage Scene Flow and Data
          • Apply Object-Oriented Principles
    • Modeling and Rigging >
      • Modeling >
        • Introduction: The Temple
        • Name Text Curve
        • Character Modeling >
          • Minecraft Steve
          • Minecraft Steve UV
          • Roblox Character modeling
          • Big Daddy
          • Character Modeling Legion the Geth
          • Character Modeling Geth Armor
        • Weapons >
          • Minecraft Tools and Weapons
          • Minecraft Movie Pickaxe
          • Minecraft Movie Sword
          • Thor's Hammer
          • Hammer
          • LOL Sword
          • Sword of Light
          • Buzz Axe
          • Weapon
      • Rigging >
        • Intro to Rigging
        • Controls
        • Rigging Basics
        • Rigging Creating Skeletons
        • Rigging: Body Controls
        • Rigging: Hands
        • Rigging: Skinning
        • Smooth Skinning
      • Animation >
        • Character Animation
    • Advanced >
      • Modeling >
        • Image Planes
        • Polygon Modeling >
          • Coke Can
          • Low Polygon Character
          • Character Modeling Legion the Geth
          • Character Modeling Geth Armor
          • Face Modeling
        • NURBS Modeling >
          • Intro to NURBS
          • Lofting
          • CV Curves
          • Organic Modeling
          • Autombile
      • Linda Training >
        • Advanced Modeling >
          • Modeling Basics
          • Modeling Room Objects
      • Texturing
      • Rigging >
        • Rigging with HumanIK
        • Smooth Skinning
  • Student Films
    • Advanced Student's movies
    • Beginning Student's movies
  • Links
    • BPA >
      • BPA Computer Modeling
    • The Top Six Animation Schools
    • The Top Video Game Design Schools

Lesson 2.4 - Collision Decisions

Our game is coming along nicely, but there are are some critical things we must add before it’s finished. First off, instead of pressing S to spawn the animals, we will spawn them on a timer so that they appear every few seconds. Next we will add colliders to all of our prefabs and make it so launching a projectile into an animal will destroy it. Finally, we will display a “Game Over” message if any animals make it past the player.

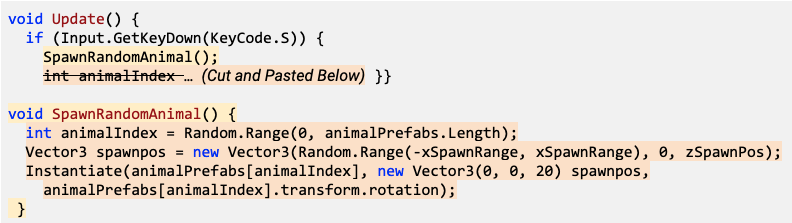
​Make a new method to spawn animals

  1. In SpawnManager.cs, create a new void SpawnRandomAnimal() {} function beneath Update()
  2. Cut and paste the code from the if-then statement to the new function
  3. Call SpawnRandomAnimal(); if S is pressed
Picture

​Spawn the animals at timed intervals

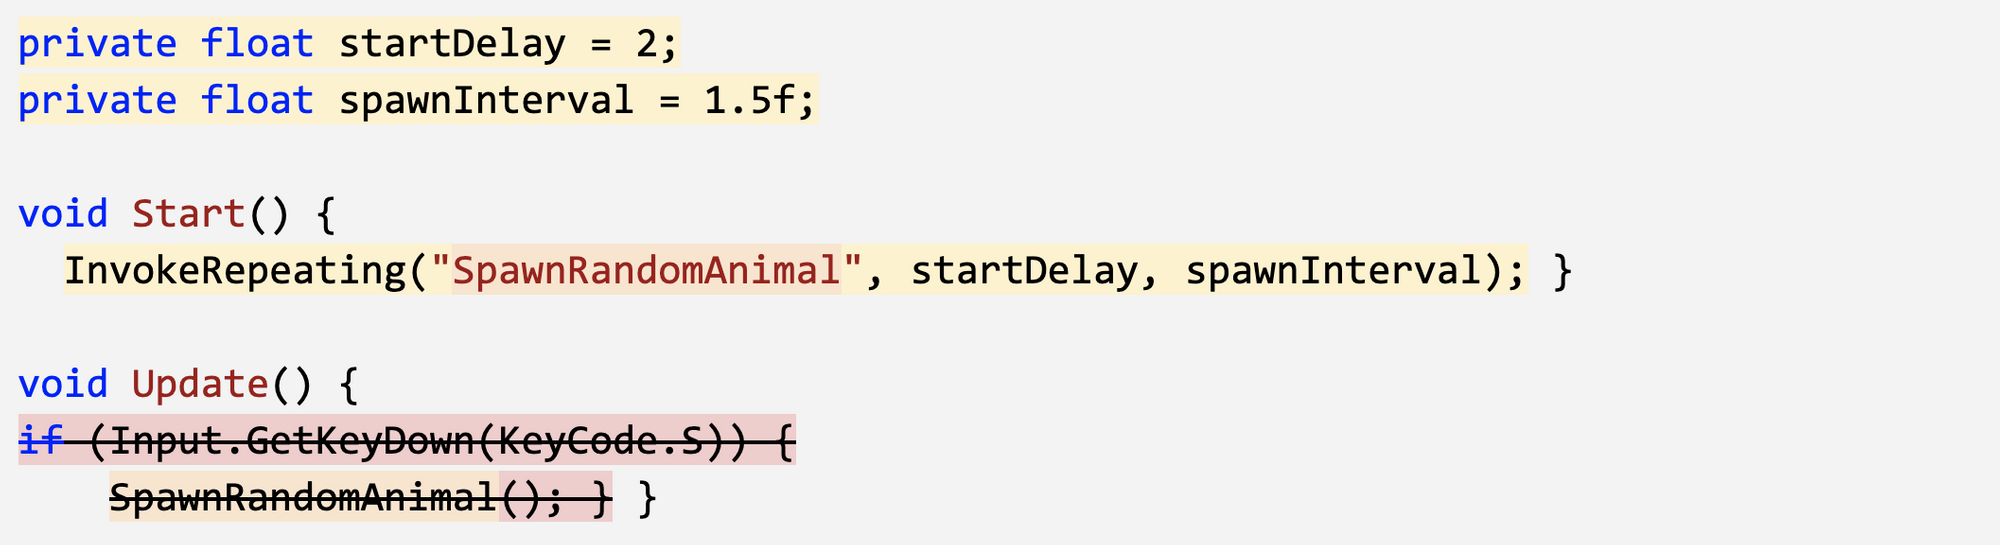
  1. In Start(), use InvokeRepeating to spawn the animals based on an interval, then test.
  2. Remove the if-then statement that tests for S being pressed
  3. Declare new private startDelay and spawnInterval variables then playtest and tweak variable values
Picture

​Add collider and trigger components

  1. Double-click on one of the animal prefabs, then Add Component > Box Collider
  2. Click Edit Collider, then drag the collider handles to encompass the object
  3. Check the “Is Trigger” checkbox
  4. Repeat this process for each of the animals and the projectile
  5. Add a RigidBody component to the projectile and uncheck “use gravity” ​

​Destroy objects on collision

  1. Create a new DetectCollisions.cs script, add it to each animal prefab, then open it
  2. Before the final } add OnTriggerEnter function using autocomplete
  3. In OnTriggerEnter, put Destroy(gameObject);, then test
  4. In OnTriggerEnter, put Destroy(other.gameObject);
Picture

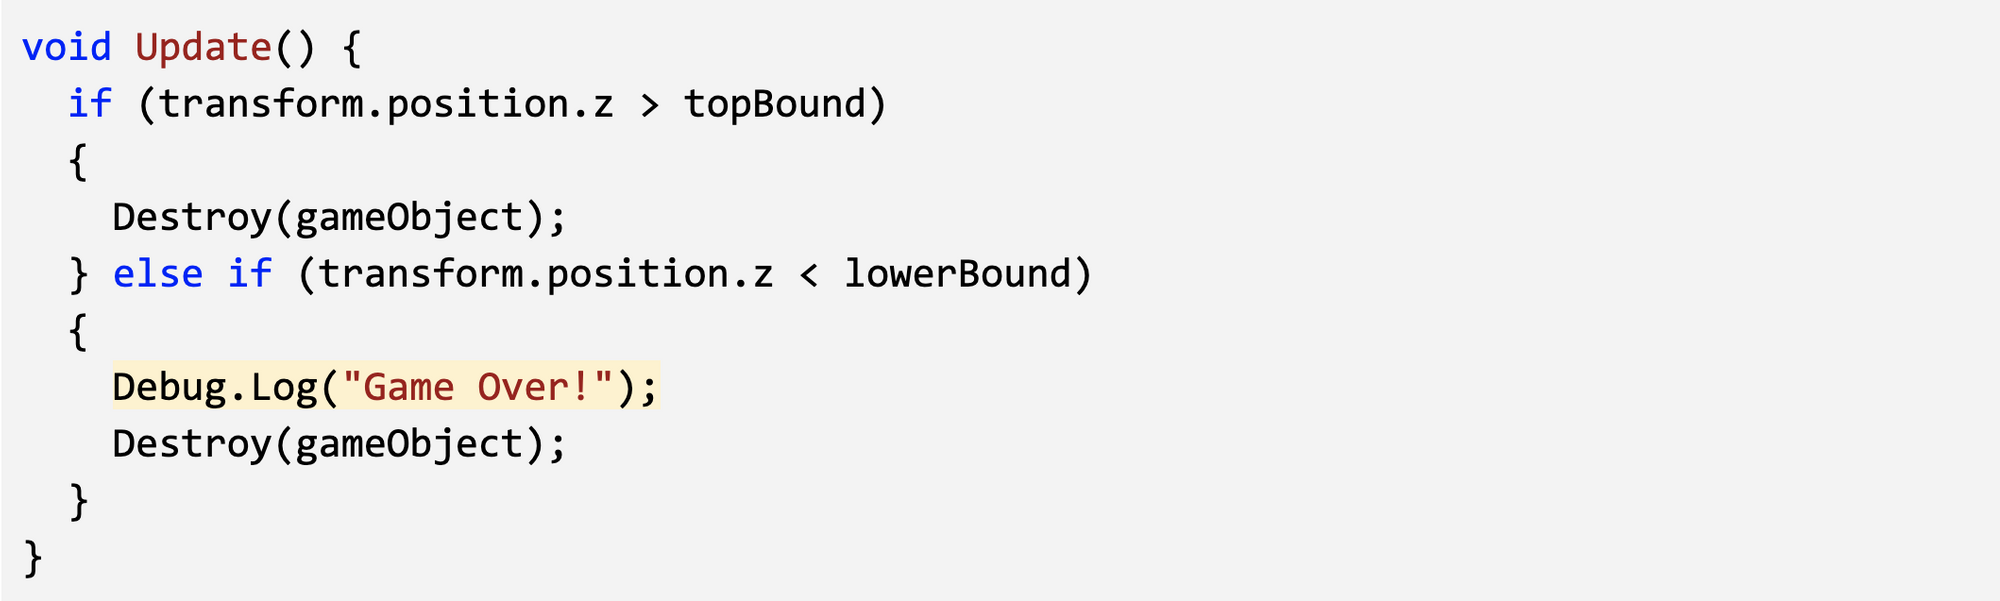
​Trigger a “Game Over” message

​
  1. In DestroyOutOfBounds.cs, in the else-if condition that checks if the animals reach the bottom of the screen, add a Game Over messsage: Debug.Log(“Game Over!”)
  2. Clean up your code with comments
  3. If using Visual Studio, Click Edit > Advanced > Format document to fix any indentation issues (On a Mac, click Edit > Format > Format Document)
Picture
Onto the next page
Proudly powered by Weebly